Create an R function:
#usage : Rscript r_test1.R <para1> <para2> <para3>

#pass parameters
args<-commandArgs(TRUE)
para1 <- args[1]
para2 <- args[2]
para3 <- args[3]

#An R function
r_test <- function(para1 = para1, para2 = para2){
  x = paste0("parament1 is:", para1, "; parament2 is:", para2)
  return(x)
}

#example
x <- r_test(para1 = para1, para2 = para2)

#output the result
write.table(x, file = para3)
Save this function as r_test1.R in the directory r_test1.
Notes:
All R file is running at Terminal window, so R codes show be easily run in terminal and its parameters would get from the terminal input.
Then the position with the parameter in terminal window would be desigined which parameter it is in R file.
commandArgs() function provides access to a copy of the command line arguments supplied when this R session vas invoked.

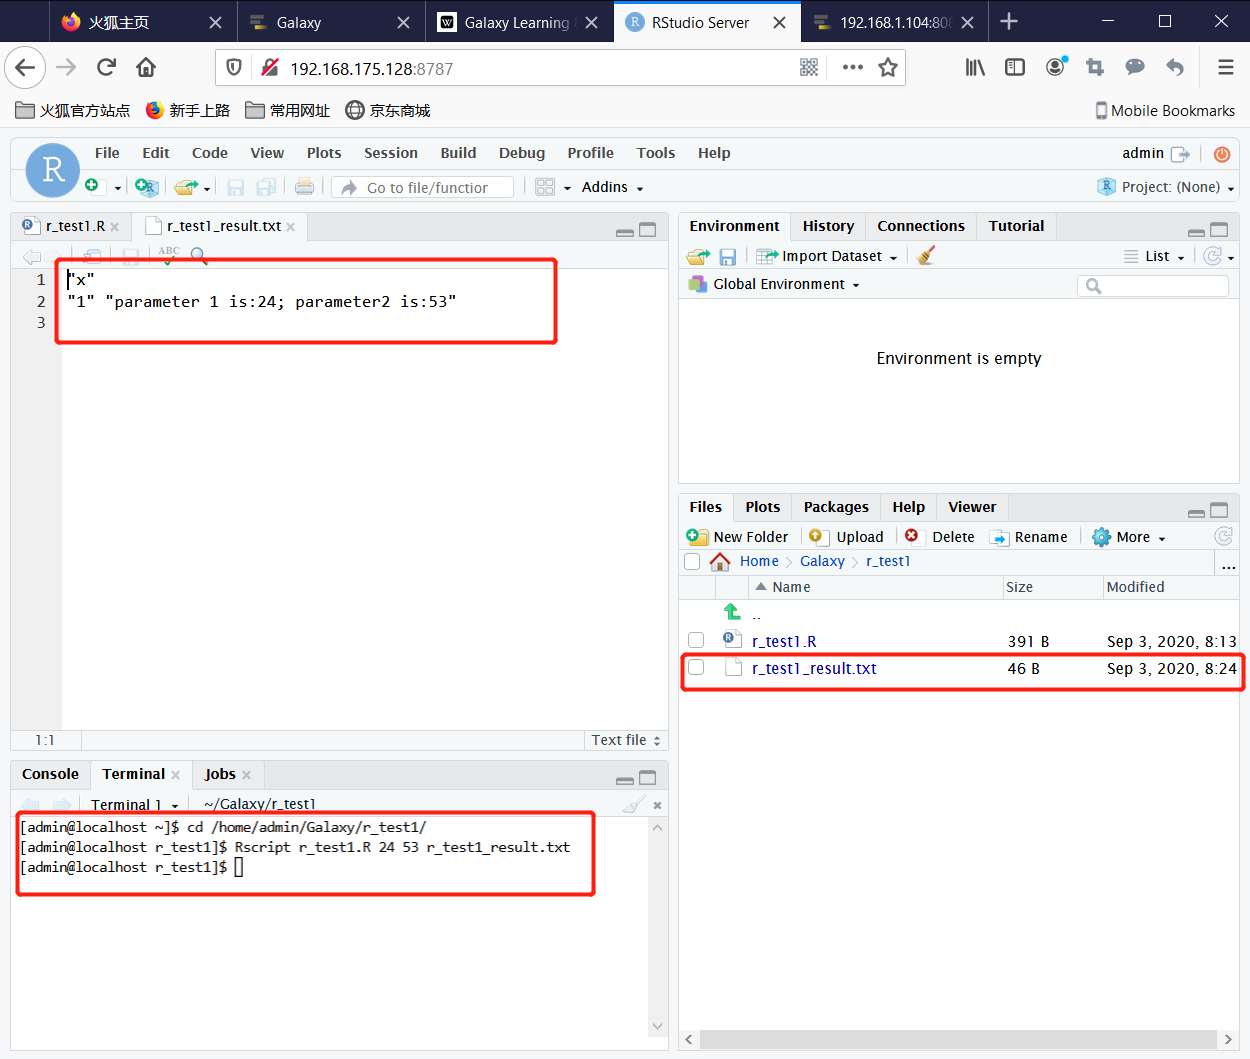
2. Test the R function in Terminal with the command
cd /home/admin/Galaxy/r_test1/
Rscript r_test1.R 24 53 r_test1_result.txt
Now you can see the content of r_test1_result.txt.
3. Using planemo build the XML file for this R function
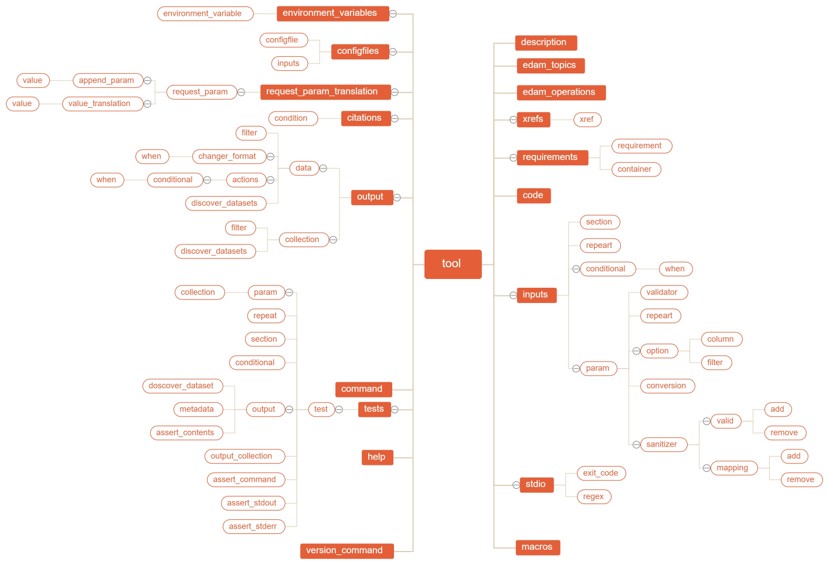
Galaxy tool definition file is XML file, or we can said it as wrapper. The XML file lays out the user interface for the tool, provides the glue that links your tool to Galaxy by telling Galaxy how to invoke it, what options to pass, and what files it will produce as output.
The galaxy already designed this XML file contents, there has a lot of tags and attribute.
More information about Galaxy XML file is at here.
Planemo is a command-line utilities to assist in developing Galaxy and Common Workflow Language artifacts - including tools, workflows, and training materials.
More information about Planemo is at here.
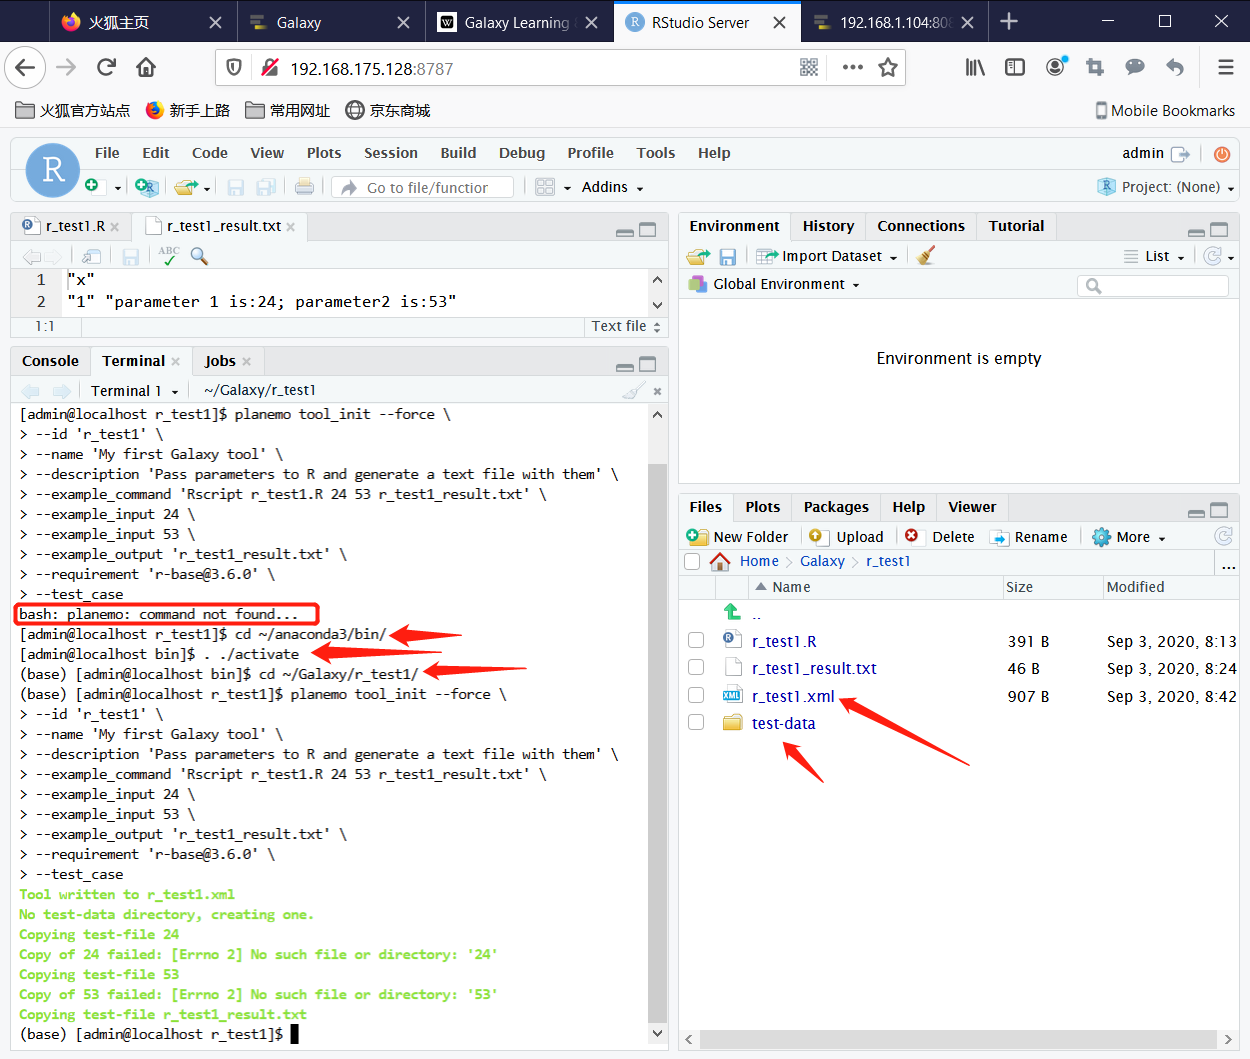
Step1: Run following command for activate conda base environment:
cd ~/anaconda3/bin
. ./activate
cd ~/Galaxy/r_test1/
Step2: Run following command in terminal to build the XML file for this R function:
planemo tool_init --force \
--id 'r_test1' \
--name 'My first Galaxy tool' \
--description 'Pass parameters to R and generate a text file with them' \
--example_command 'Rscript r_test1.R 24 53 r_test1_result.txt' \
--example_input 24 \
--example_input 53 \
--example_output 'r_test1_result.txt' \
--requirement 'r-base@3.6.0' \
--test_case
Notes: Here are planemo tool_init command help:
Usage: planemo tool_init [OPTIONS]

  Generate tool outline from given arguments.

Options:
  -i, --id TEXT             Short identifier for new tool (no whitespace)
  -f, --force               Overwrite existing tool if present.
  -t, --tool FILE           Output path for new tool (default is <id>.xml)
  -n, --name TEXT           Name for new tool (user facing)
  --version TEXT            Tool XML version.
  -d, --description TEXT    Short description for new tool (user facing)
  -c, --command TEXT        Command potentially including cheetah variables
                            ()(e.g. 'seqtk seq -a $input > $output')

  --example_command TEXT    Example to command with paths to build Cheetah
                            template from (e.g. 'seqtk seq -a 2.fastq >
                            2.fasta'). Option cannot be used with --command,
                            should be used --example_input and
                            --example_output.

  --example_input TEXT      For use with --example_command, replace input file
                            (e.g. 2.fastq with a data input parameter).

  --example_output TEXT     For use with --example_command, replace input file
                            (e.g. 2.fastq with a tool output).

  --named_output TEXT       Create a named output for use with command block
                            for example specify --named_output=output1.bam and
                            then use '-o $output1' in your command block.

  --input TEXT              An input description (e.g. input.fasta)
  --output TEXT             An output location (e.g. output.bam), the Galaxy
                            datatype is inferred from the extension.

  --help_text TEXT          Help text (reStructuredText)
  --help_from_command TEXT  Auto populate help from supplied command.
  --doi TEXT                Supply a DOI (http://www.doi.org/) easing citation
                            of the tool for Galxy users (e.g. 10.1101/014043).

  --cite_url TEXT           Supply a URL for citation.
  --test_case               For use with --example_commmand, generate a tool
                            test case from the supplied example.

  --macros                  Generate a macros.xml for reuse across many tools.
  --version_command TEXT    Command to print version (e.g. 'seqtk --version')
  --requirement TEXT        Add a tool requirement package (e.g. 'seqtk' or
                            'seqtk@1.68').

  --container TEXT          Add a Docker image identifier for this tool.
  --cwl                     Build a CWL tool instead of a Galaxy tool.
  --help                    Show this message and exit.
Now there has r_test1.xml file and test-data directory in r_test1 directory. r_test1.xml content should be as following.
<tool id="r_test1" name="My first Galaxy tool" version="0.1.0" python_template_version="3.5">
    <description>Pass parameters to R and generate a text file with them</description>
    <requirements>
        <requirement type="package" version="3.6.0">r-base</requirement>
    </requirements>
    <command detect_errors="exit_code"><![CDATA[
        Rscript r_test1.R '$input1' '$input2' '$output1'
    ]]></command>
    <inputs>
        <param type="data" name="input1" format="" />
        <param type="data" name="input2" format="" />
    </inputs>
    <outputs>
        <data name="output1" format="txt" />
    </outputs>
    <tests>
        <test>
            <param name="input1" value="24"/>
            <param name="input2" value="53"/>
            <output name="output1" file="r_test1_result.txt"/>
        </test>
    </tests>
    <help><![CDATA[
        TODO: Fill in help.
    ]]></help>
</tool>
Step3: Before we test this tool, we must modify type attribute in <param>and the content of <command>. Also edit help text.
<tool id="r_test1" name="My first Galaxy tool" version="0.1.0" python_template_version="3.5">
    <description>Pass parameters to R and generate a text file with them</description>
    <requirements>
        <requirement type="package" version="3.6.0">r-base</requirement>
    </requirements>
    <command detect_errors="exit_code"><![CDATA[
        Rscript $__tool_directory__/r_test1.R '$input1' '$input2' '$output1'
    ]]></command>
    <inputs>
        <param type="text" name="input1" value="" label="Label for the first parameter" />
        <param type="text" name="input2" value="" label="Label for the second parameter"/>
    </inputs>
    <outputs>
        <data name="output1" format="txt" />
    </outputs>
    <tests>
        <test>
            <param name="input1" value="24"/>
            <param name="input2" value="53"/>
            <output name="output1" file="r_test1_result.txt"/>
        </test>
    </tests>
    <help><![CDATA[
        #usage : Rscript r_test1.R <para1> <para2> <output_file>
        <para1> and <para2> is text.
        <output_file> is a txt file.
    ]]></help>
</tool>
Note:
We add $__tool_directory__/ before r_test1.R in order to help galaxy find out the file. $__tool_directory__/ is the directory the tool description (XML file) currently resides in.
More reserved varibles are at here.
Because our parameter are not data type, so we must change it.
Here has a link to help you how to write attribute of all kinds of parameter.
4. Download Galaxy and make some changing
When you first use Galaxy, you should do some changing in case showing ERROR.
Step1: download the Galaxy:(If you already had galaxy, don’t download again.)
git clone -b release_20.05 https://github.com/galaxyproject/galaxy.git
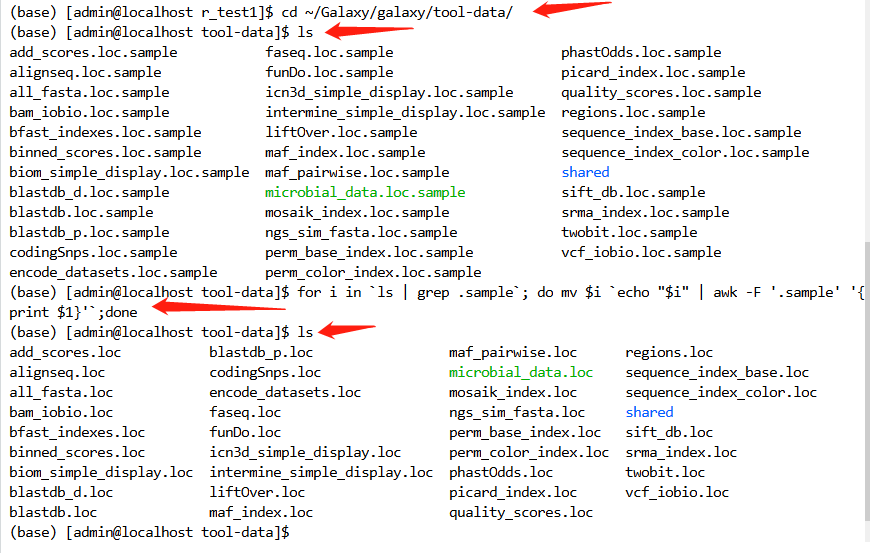
Step2: copy or rename all files in galaxy/tool-data directory.
All filename suffix ends with .loc.
cd ~/Galaxy/galaxy/tool-data/
ls
for i in `ls | grep .sample`; do mv $i `echo "$i" | awk -F '.sample' '{print $1}'`;done
ls
Step3: copy or rename the tool_data_table_confi.xml.sample files as tool_data_table_confi.xml in galaxy/config directory.
cp ~/Galaxy/galaxy/config/tool_data_table_conf.xml.sample ~/Galaxy/galaxy/config/tool_data_table_conf.xml
5. Open the port with command:
sudo firewall-cmd --zone=public --permanent --add-port=9090/tcp
sudo firewall-cmd --reload
sudo firewall-cmd --list-ports
6. Test the tool with planemo s or planemo serve
Step1: Run following command in terminal:
cd ~/Galaxy/r_test1/
planemo s --galaxy_root /home/admin/Galaxy/galaxy \
--galaxy_python_version 3.6 \
--host 0.0.0.0 \
--port 9090
Notes:
In my serve, galaxy root is at /home/admin/Galaxy/galaxy, so please change the path to your galaxy root when use yours.
--galaxy_python_version 3.6 is tell the planemo using python 3.6 instead of python2.7, if you didn’t set, then it will show ERROR when you run.
--host 0.0.0.0 is for remote computer checking the web.
--port INTEGER is port to seve galaxy on (default is 9090). So before we check the web with remote computer, we need to open the port 9090 or you designed.
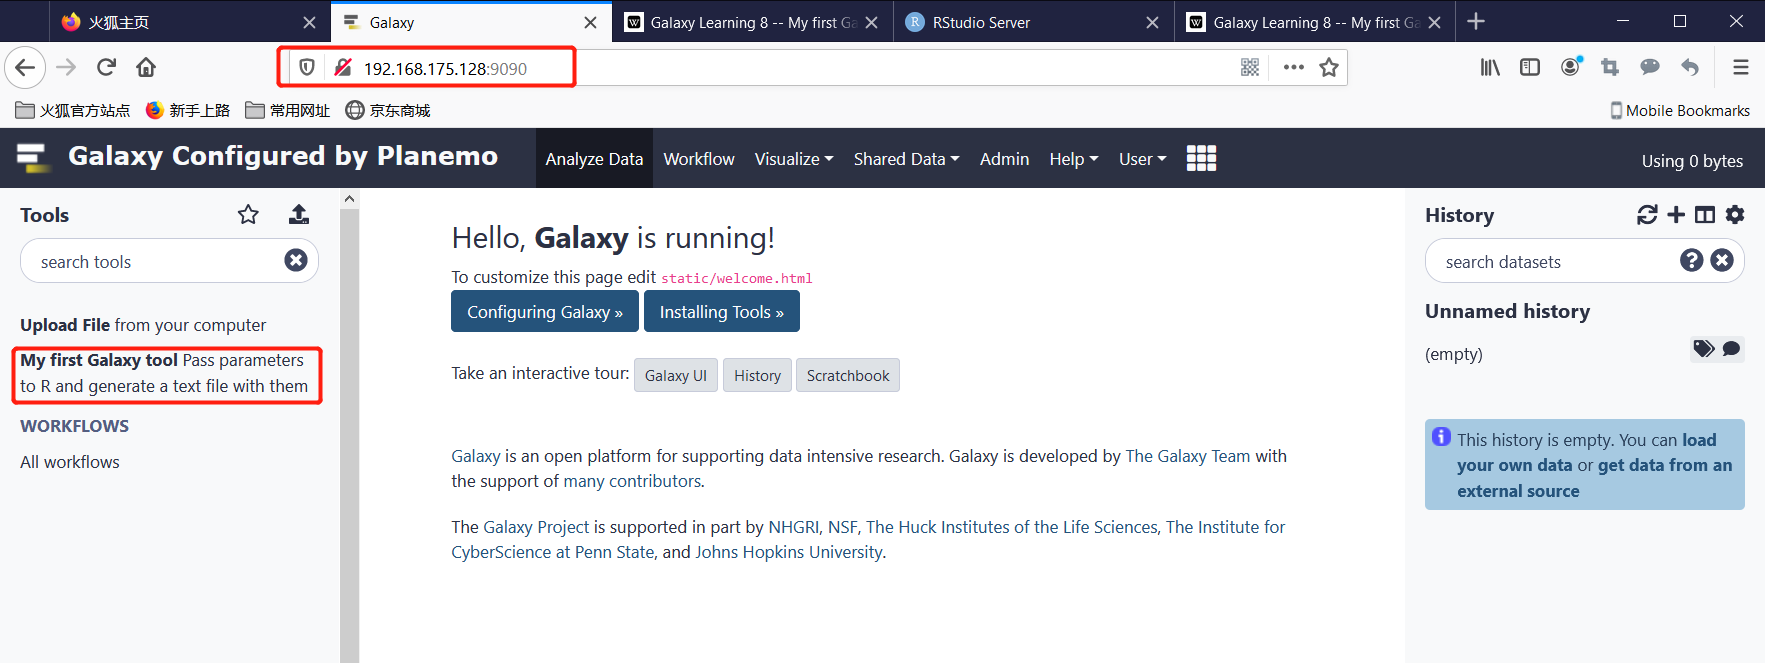
Step2: Open http://server_IP:9090 with browser:
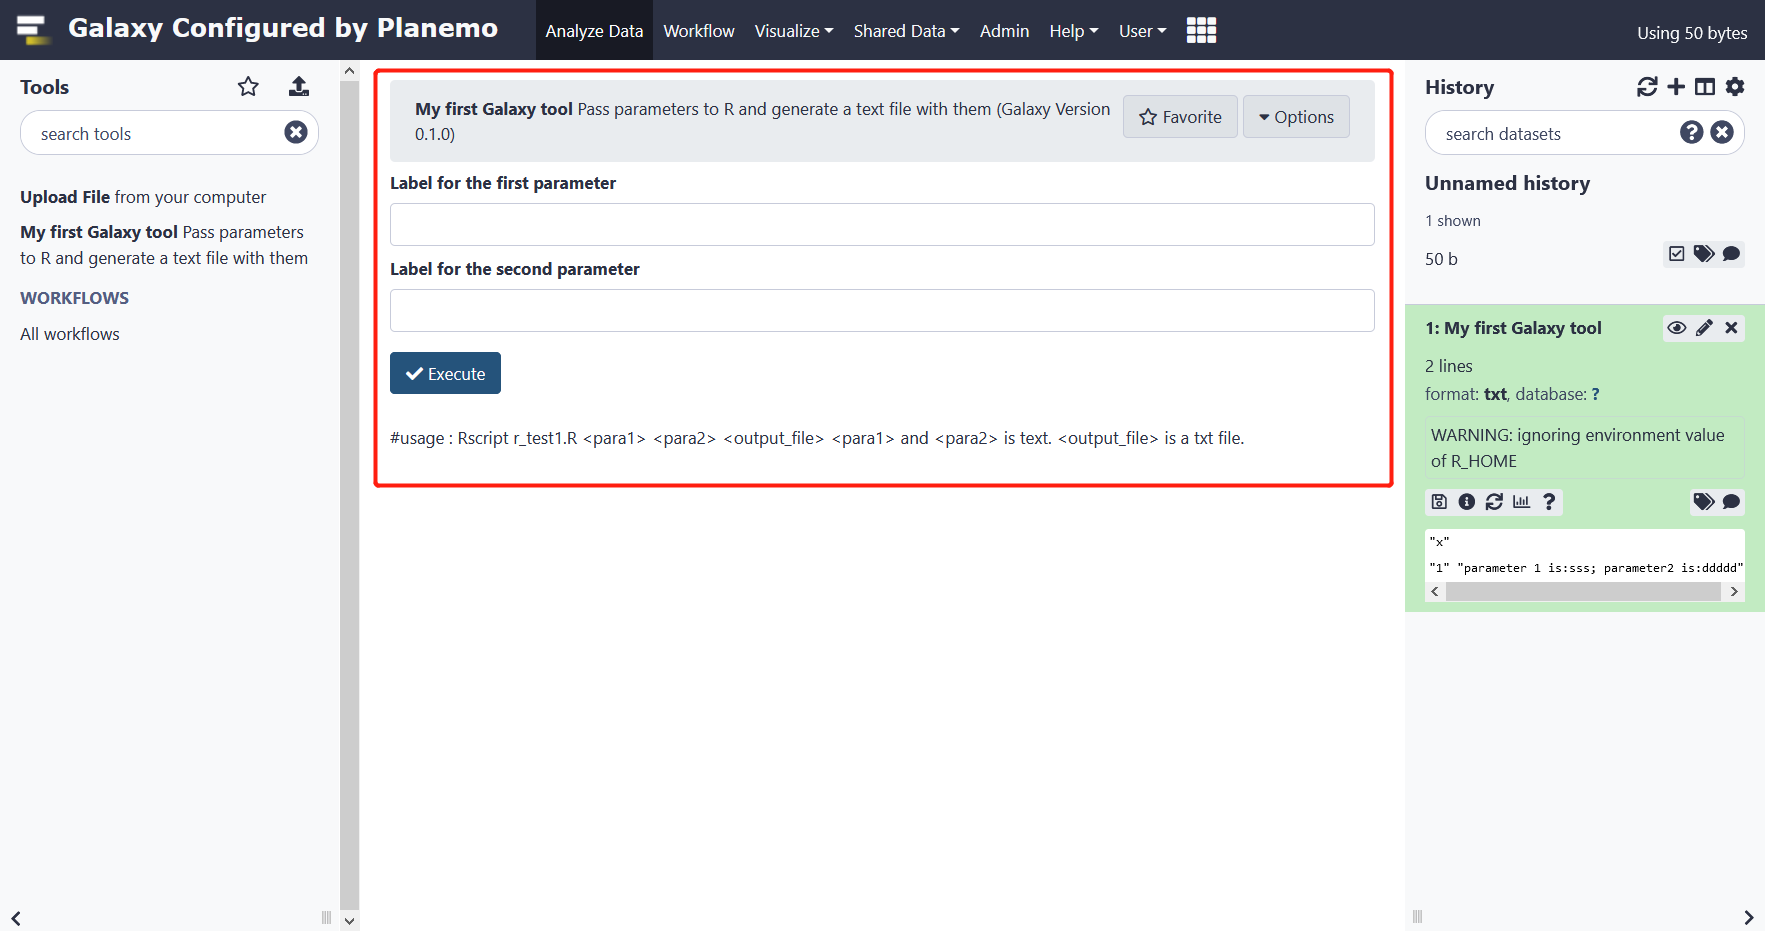
Test this tool:
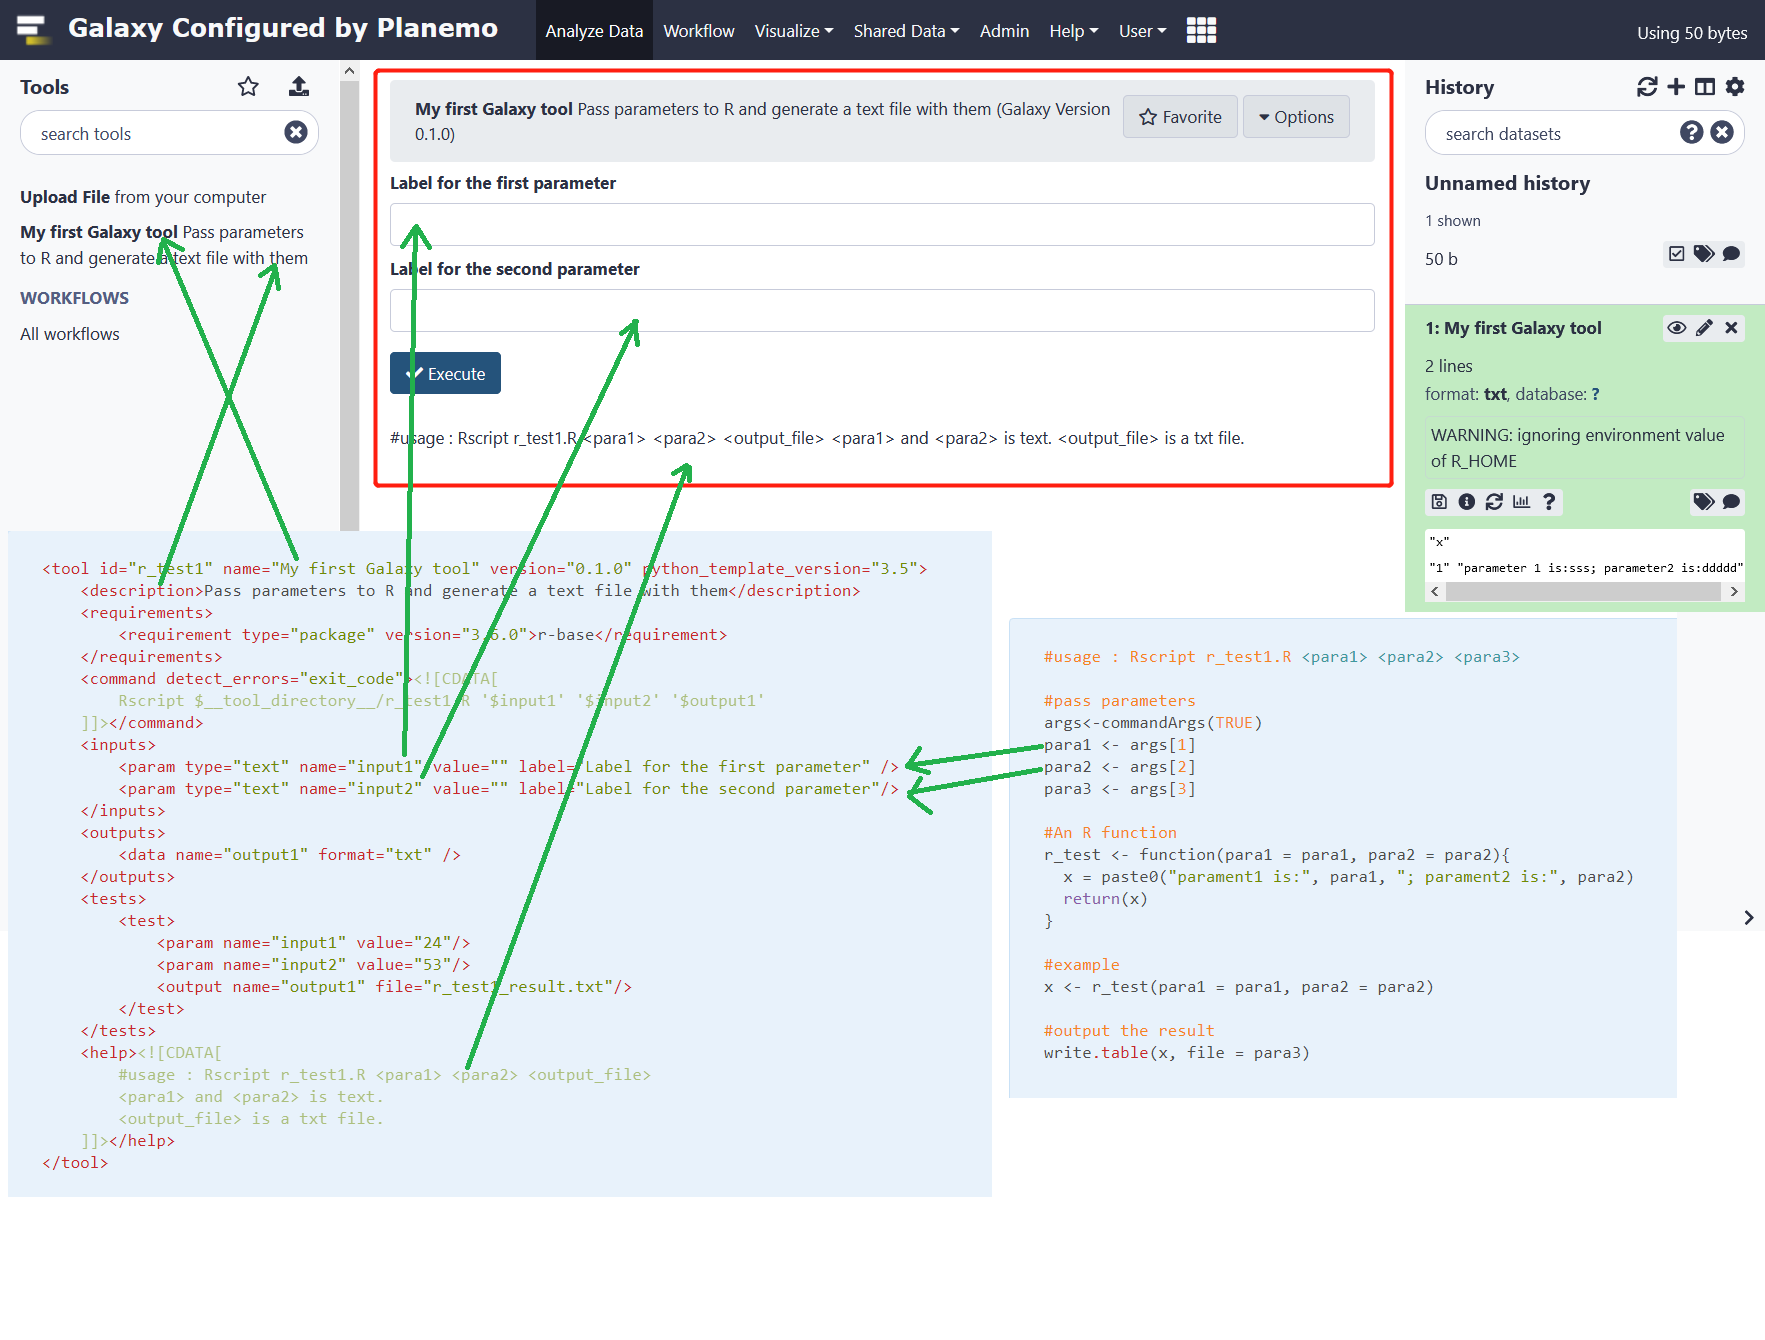
Input sss in box 1 and ddddd in box 2, the result as following:
7 Parameters map R file,XML file and galaxy tool interface.